Tuesday, September 20, 2011

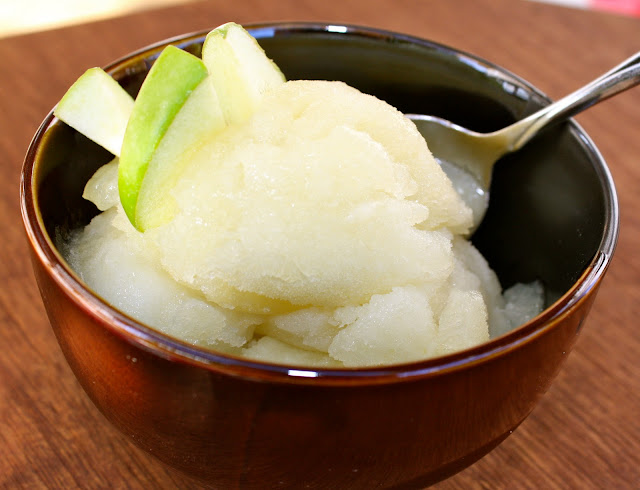
Green Apple Sparkling Wine Sorbet


It's fall and there's nothing quite like a fresh, crisp apple with its sweet juices running down your palm after the first bite, or the warm, cozy cinnamon and apple spiced air from a bubbling pie in the oven. Or, in this particular recipe, the light and sparkling twist on this refreshing green apple sorbet, perfect for an Indian summer!


Start with dicing three Granny Smith apples in about 1" cubes.  They don't have to be precise because you're just going to mash them up after they're soft.


In a 4 quart saucepot, simmer the apples, sugar and1 cup water, partially covered for 10-15 minutes until softened.


Remove from heat, and stir in wine, salt and lemon juice.

Pass the mixture through a fine mesh sieve to smooth any lumps and remove the peels.  *I found this step rather tedious, and felt it could have been eliminated if I had peeled the apples in the first place.  So, if you realized this faster than me, simply whisk your mixture and skip the sieve!*

Straining the apple puree...

Still working on it...

A smooth, sparkling apple puree!

Freeze in a 9x13" pan for an hour, then scrape with a spoon and serve in a dish.

The crisp, clean flavor of this sorbet is so refreshing as a dessert after dinner, or for a warm afternoon!  Enjoy!

Don't forget the shopping list!

Green Apple Sauvignon Blanc Sorbet
http://www.sunset.com/food-wine/kitchen-assistant/green-apple-sorbet-recipe-0041000069465/

Makes 3 1/2 cups
3/4 cup sugar
1 1/4 lbs tart green apples (3 medium)
3/4 cup chilled Sauvignon Blanc (I used sparkling white wine)
1/4 tsp. salt
1 tsp. lemon juice

From one hearty appletite to another, happy cooking!

Photography by Sandra Baumgarten ©

Monday, September 12, 2011

Harvesting Summertime: Roasted Spicy Tomato-Basil Soup


Despite this sudden heatwave that has swept through the Pacific Northwest, as though its nature’s attempt at an apology to those folks who felt we were gipped in the summer department, the leaves are changing and the night air is cool. We are bidding adieu to fresh summer berries, crisp veggies and juicy fruit until next season, and saying hello to sweaters, mugs of hot cocoa, thicker quilts and soups. I find this time exciting; this transitioning to the cooler temperatures in eager anticipation of holidays and cozy Saturdays in front of the fireplace. However, if we could just bottle the deliciousness of summer, we would have the best of both worlds!

The soup recipe I’m about to share with you does just that: it bottles up some of the best summer has to offer and tucks away nicely to become a comfort soup for the chilly days that lay ahead. For those of you who grow tomatoes and zucchini, the return on your crop is usually plentiful! They’re kind of an “all or nothing” sort of food, and if you’re on the “all” end, you run out of things to do with them. What a wonderful problem to have! So, gather up your basket and head to your garden (or local farm if you let someone else be the green thumb) to pick about five pounds of tomatoes, several handfuls of basil leaves (4 cups to be exact) and let’s get cookin’!


Preheat the oven to 400 F. Cut each tomato in half lengthwise, and toss in a bowl with olive oil, salt and pepper.

Lay them face up in one layer on a baking sheet with edges and roast for 45 minutes.

The salt and the roasting draw the juices out so handle accordingly when pulling from the oven.

Next, grab a tissue and start chopping onions! Then chop up 6 cloves of garlic. You don't have to chop meticulously because everything will be passed through the juicer in the end. Sauté the onions, garlic, and crushed red pepper flakes in 2 tablespoons of oil for 10 minutes, stirring occasionally, until golden brown.

This recipe calls for 4 cups of chicken stock. I don't always have this on hand so I substitute "Better Than Bouillon." True to its name, it is definitely the better choice with half the sodium and twice the taste as dried bouillon granules. Use one teaspoon per one cup of water to reconstitute a chicken stock.

Oh, I wish you could smell this! Give a few slices to chop up the basil and bruise the leaves into releasing their tangy sweetness. And, guess what? Look at all those greens you're about to eat!

Add the tomatoes, once they're done, and juices from the pan, the basil, thyme, and chicken stock, and bring to a boil and simmer uncovered for 40 minutes. Stir to keep the bottom from scorching.

From an ugly ducking to a swan, this part transforms the soup from a chunky conglomeration of vegetables, to a smooth elegant soup fit for fine dining! Pass the soup through a food mill or juicer.

And here it is! Summertime harvested into a bowl! It can be served hot or cold, in summer or winter. For a heartier twist, add a tablespoon (or two!) of cream to each bowl before serving. The recipe yields just over 2 quarts. If there's any left over, jar it and freeze it for the day in December when you're dreaming of summer, and needing to remind yourself exactly what it tasted like!

Don't forget the shopping list!

Roasted Spicy Tomato-Basil Soup
5 pounds tomatoes
1/4 cup, plus 2 tablespoons olive oil
1 tablespoon sea salt
1 1/2 teaspoon freshly ground pepper
2 cups chopped yellow onions
6 cloves of garlic, chopped
1/4 teaspoon crushed red pepper flakes
4 cups loosely packed basil leaves
1 teaspoon fresh thyme leaves (dried will work)
4 cups chicken stock (or 4 teaspoon Better Than Bouillon + 4 cups water)

Nutritional information:

Tomatoes: Cancers such as prostate cancer, cervical cancer, colon cancer, rectal cancer, and cancers of the stomach, mouth, pharynx, and esophagus have all been proven to be staved off by high levels of Lycopene.

Basil: Can aid in the treatment of diabetes, respiratory disorders, impotence, and allergies, and infertility. Basil contains cinnamanic acid, a powerful compound proven to enhance circulation, stabilize blood sugar, and improve respiration.

Onions: Fight against bacteria like Salmonella, E. coli, colds, coughs, bacterial infections, angina, breathing problems, poor appetite, cardiovascular disease and tumor growth.

Garlic: It's been considered by many to be an herbal "wonder drug," with a reputation in folklore for preventing everything from the common cold and flu to the Plague!

From one hearty appletite to another, happy cooking!

Photography by heartyappletite ©
Saturday, September 10, 2011

Twix Pie


My sister was over the other day and said that she had a craving for some kind of Twix pie with chocolately, gooey caramel and crunchy cookies. I didn't think too hard about this, because I'd never heard of a Twix pie, and my limited imagination saw a pile of melted candy bars in a pie crust. However, when she came by the next day and started telling me about this craving for a second time, (me noticing that her hands were gesturing in the same motions, as though she were feeling its creamy goodness in between her fingers) I woke up and took notice and thought, "I've got to make this girl a pie!"

The next morning, I was struck by inspiration in the shower (where all good thoughts originate) and I made a list, perfecting the idea in my head. I was excited to get to work on it!

Staying true to the candy bar, I made a shortbread cookie crust. I combined the flour, sugar and butter until small crumbs formed in my mixer.


Next, I pressed the crumbs flat into a pie pan and baked the crust at 350 degrees for 15 minutes, until light golden brown. Then I allowed it to cool completely.

The second task required a proper filling. I didn't want the chocolate pudding to get too sweet, so I reduced the amount of sugar normally found in vanilla pudding. I used a 4 quart saucepot and blended the sugar and cornstarch together until there were no lumps.

I added cold milk, and whisked until the milk started to get frothy. I'm not sure why, but I've found from experience that the pudding seems to thicken more uniformly when I've really whisked the ingredients together first. Also, I like to make my puddings on the stove versus a microwave. I know there's a higher risk of scorching the milk, but the pudding is definitely creamier when stirred constantly over medium-high heat. (I found this out when our microwave died and I was forced to make my pudding on the stove! A blessing in disguise...)

While the milk starts to heat, separate the yolks from the eggs, discarding the whites and the "belly buttons," as my mom always called them. In puddings and custards, she always taught me to remove the wiggly white part of the egg that connects to the yolk. It's not very appetizing to come across "egg gristle" in a creamy dessert!

After the milk comes to a boil for 2 minutes (making sure that you've stirred constantly after the initial 2-3 minutes), slowly pour about half of it into your beaten yolks, stirring continuously as you do so. This allows the yolks to be gently warmed by the milk, and doesn't shock them into scrambling!


Now it's time to slowly pour the egg and milk mixture, back into the rest of the hot milk. Return to the stove, and bring it back up to a gentle boil for one minute.

My mama done tol' me... Best piece of advice (well, one of the best pieces of advice!) I learned from my mom: "Whenever there's chocolate, there should be vanilla." Since we're throwing in a cup of chocolate chips, throw in a teaspoon of vanilla too!

Turn off the stove, and let the chocolate chips melt in the hot pudding.

There's that whisk again!

Ah, the chocolatey goodness part is completed! Cover the pudding with plastic wrap, making sure that it touches the pudding. Otherwise, a film will form on the pudding and add "bits" to your otherwise silky velvet chocolate. Chill until cold ~2 hours.

Bring on the candy!

Pour the caramel ice cream topping over the crust. At first I had the idea to use chewy caramel candies and let them melt on the hot crust. But, I did that once for a different pie, and once the caramel cooled, it became too hard and dominated the dessert. The sundae topping worked perfectly and wasn't at all overwhelming.

Creamy goodness time! Slowly fold the Cool Whip into the chocolate pudding, being careful not to over-mix. We want "puffy" pie :)


Don't worry about mixing too thoroughly. It's pretty to see the swirled colors!

Almost done! Time to whip up the whipping cream. Start the mixer and slowly add the sugar. We're not making butter, but we do want it to hold its peaks!


Top with chopped up Snickers...just kidding...TWIX!!! I used two King Sized Twix bars. (Don't be surprised if the people in your house start hovering around you by this point...go ahead, let them snitch!)

Aha! Behold, Twix Pie!!! If you want it to come out in perfect pie shape, you will most likely need to chill it for 2 hours before serving. If you can't wait that long, and your family won't LET you wait that long, serve it up! It's actually pretty darn yummy to see a plate of...what was it?..."chocolately, gooey caramel goodness" in a big messy pile on your dessert plate!

Don't forget the shopping list!

Crust:
3/4 stick of butter
1/4 cup brown sugar
1 cup flour

Caramel Layer:
1/2 cup caramel flavored ice cream topping

Chocolate Pudding:
1/2 cup sugar
3 tablespoons cornstarch
3 cups milk
3 egg yolks
1 teaspoon vanilla
1 cup semi-sweet chocolate chips
1 16 oz container Cool Whip

2 King Sized Twix Candy Bars

*Helpful hint: When making a pudding, I use the 1:1:1 ration: One tablespoon cornstarch to one cup milk to one egg yolk. Makes the perfect thickness!

From one hearty appletite to another...happy cooking! Thanks, Sis ;)

Monday, September 5, 2011

Peach Tart, Pretty Please!


I almost want to say that peaches are my favorite fruit. Let me qualify that statement--FRESH peaches are my favorite fruit! It may be that I'm being seduced by this splendid slice of pie next to me as I type, but the only fruit that could possibly compete is the strawberry (see pictures from my January post for the strawberry pie!) At the local farmer's market, these peaches were begging to be made into a pie...who was I to refuse?!

This recipe starts off with a quick crust that I make in my Kitchen Aid. Mix together butter, sour cream and flour until it forms a ball, then pat it down in a pie pan until it's about 1/4" thick. Bake it for 15 minutes at 375 F; until it's set but not browned.

While the crust is baking, slice and peel 3 large peaches. You will want approximately 3-4 cups of peaches. Lay aside, and go back to the mixer. Don't bother washing it out from the crust: it all goes in the same pie! Blend together egg yolks, sugar, sour cream, and flour.

When the crust comes out of the oven, it's a bit bubbly so simply poke it a few times with a knife and it will lay down again in eager anticipation of the PEACHES!! :)

If you want it to be fancy, use less peaches and arrange them in a pattern. If you want a more peachy experience (like me!), pile on the peaches!!!

Pour the custard filling over the top, and place back in the oven for 45-50 minutes at 350 F. *note* Wear hot mitts--don't forget that your pie pan is still hot when you go to put it back in the oven!

Serve warm with heavy cream drizzled over the top!

Don't forget the shopping list!

Peach Tart

Crust:
1 1/4 cups flour
1/2 butter
2 tablespoons sour cream

Custard:
3 egg yolks
3/4 cup sour cream
3/4 cup sugar
1/4 cup flour

3-4 large peaches

From one hearty appletite to another...happy cooking!