Saturday, July 28, 2012

S'more, S'mores please!


My family loves to go camping, and no trip is complete without s'mores!  I always buy a bag of marshmallows, a box of graham crackers, and several Hershey's bars, but I'm not a huge fan of them.  I usually feel over-sweeted...is that possible?...after eating them.  UNTIL NOW! :)  A word to the wise...after making these, you will never want store-bought fixin's again!


I tackled my fear of making marshmallows by using Martha Stewarts super easy marshmallow recipe...


then hopped over to Smitten Kitchen for her delicious homemade graham crackers!  

Buttery, and slightly chewy homemade graham crackers!

The marshmallows melt into a soft creaminess!
From one hearty appletite to another...happy baking!

Monday, July 16, 2012

Chi Chi Dango Mochi

Soft and chewy Chi Chi Dango Mochi

I’m a huge fan of the new frozen yogurt places that are popping up everywhere, and one topping that I see at all the places is Mochi, a soft and chewy Japanese candy.  It’s like a thick gel, gummy treat, but it isn’t like a jelly bean that is forever stuck in your teeth.  It has a mildly sweet rice flavor, that isn’t overwhelming as a topping yet is perfectly delicious on its own--I should know...I’ve eaten LOTS! :)

I found this recipe for Chi Chi Dango Mochi, and decided to give it a go!  I took the hints given in the comments, and it turned out perfectly.  I had to laugh when the recipe said, "Don't double it," because there's MORE THAN ENOUGH in a single recipe.  I got three big bowls full.


A great treat for lunches that easily packs along!

From one hearty appletite to another...happy baking!

Chi Chi Dango Mochi
1 pound mochiko (glutenous rice flour)
2 1/2 cups white sugar
1 teaspoon baking powder
2 cups water
1 teaspoon vanilla extract (I'd suggest 2 teaspoons because I didn't even notice just 1 tsp.)
1 (14 ounce) can coconut milk
1 1/2 cups potato starch

Preheat oven to 350 degrees F (175 degrees C). Grease a 9x13 inch pan. Whisk together the rice flour, sugar and baking powder; set aside.

In a medium bowl, mix together the water, vanilla, and coconut milk.  Blend in the rice flour mixture.  Pour into the prepared glass pan.

Cover the pan with foil and bake for 1 hour.  Allow to cool completely.

Turn the pan of mochi out onto a clean surface that has been dusted with potato starch.  But into bite size pieces using a plastic knife.  The mochi does not stick as much to plastic knives.

*Tips:  take the mochi out after one hour, whether it looks done to you or not.  It IS done :)  Over-baking will cause it to be dry and tough.

Photograph © Hearty Appletite


Tuesday, June 26, 2012

Oh My! Strawberry Pie!

Strawberry Pie!
Strawberry Pie is one of my all-time favorite pies!  It's not just a pie, but a significant milestone in the calendar year.  It means that summer is here, berry season is upon us, and we can go out to the fields with our berry buckets to stock our freezers with a taste of summertime!


A quick rinse to make sure there's no dirt, or little critters!


The great thing about this pie is that it's easy, takes only a few ingredients and can be made really quickly.  Plump, juicy strawberries, dripping with flavor and naturally vibrant.  There's nothing better!

Add a dollop of whipped cream!

Add a fork, and you're ready to go!  Yummm!
Fresh Strawberry Pie
6 cups fresh strawberries, frozen do not substitute
2/3 cups sugar
2 tablespoons cornstarch
2/3 cup water

In a saucepan, mash one cup of berries.  Combine the cornstarch and water until well blended, and add to the crushed strawberries.  Cook and stir over medium heat until misture is thickened and bubbly.  Cook one minute.

Spread about 1/4 of the glaze over bottom and sides of crust.  Arrange strawberries and add remaining glaze over the top, taking care to cover each berry.  Chill for 1 hour.  Top with whipped cream and serve.

Shortbread Crust
1/2 butter, slightly softened
1 cup unsifted flour
1/4 cup brown butter
1/2 teaspoon vanilla

Mix together until crumbly.  Press into 9" pie pan and bake at 350 F for ~16 minutes, or until light golden brown.

Photograph © Hearty Appletite

Saturday, June 9, 2012

DIY Drumstick Ice Cream


                                               I scream,                            You scream,                        We all scream for ice cream!!!


My kids introduced me to Drumstick Ice Cream Cones last summer.  I had spent my whole life, blissfully unaware of the deliciousness of boxed ice cream cones, due to the name of them.  When I hear "drumstick," my mind goes to poultry, not creamy ice cream, dipped in melt-in-your-mouth chocolate, topped with sprinkles.


After polishing off a box of them...the whole family, not just me!... I decided it would be fun to make our own.  I made the "magic shell" chocolate coating from chocolate chips and coconut oil, and rolled it around the inside edges of the cones.  (I kept all the cones in the freezer if I wasn't working with them that second). After the chocolate hardened (happens quickly in the freezer), I filled them up with slightly softened vanilla bean ice cream, dunked them back in the chocolate sauce, and quickly doused them with sprinkles before they froze.


From one hearty appletite to another...happy baking!

DIY Drumstick Ice Cream Cones
One package sugar ice cream cones
Half gallon of your favorite ice cream
1 cup of chocolate chips
2 tablespoons coconut oil

Photograph © Hearty Appletite

Tuesday, June 5, 2012

Peanut Butter Chocolate Chip Cookies


I can only be thankful that my husband doesn't love these cookies, because that means ALL THE MORE FOR ME! :)  This is the best recipe for peanut butter cookies that my family has ever found, and it's no longer in print.  It comes from the original 1963 Betty Crocker's Cooky Book.  There's a new edition of the old book, but they've slightly changed some of the recipes.  Not cool.  Anyway, you won't find fault with these!


Hot from the oven!


Thick and chewy, yet delicately buttery :)  Enjoy!


From one hearty appletite to another...happy baking!

Peanut Butter Cookies, adapted from Betty Crocker's Cooky Book 1963
1/2 cup butter
1/2 cup peanut butter
1/3 cup sugar
1/3 cup packed brown sugar
1 egg
1 1/2 cups flour
1/2 teaspoon baking powder
3/4 teaspoon baking soda
1 cup chocolate chips (optional)

Mix butter, peanut butter, sugars and egg thoroughly.  Measure flour by dipping method.  Blen all dry ingredients; stir into butter mixture.  

Heat oven to 375 F.  Roll dough in 1 1/4" balls.  Place 3" apart on lightly greased baking sheet.  Flatten slightly crisscross style with fork tongs.  Bake 9-10 minutes.

Wednesday, May 23, 2012

Cream Cheese Chocolate Chip Brownies

Cream Cheese Chocolate Chip Brownies

It's hard to go wrong with brownies when you're craving something warm, gooey, chewy and totally chocolatey!  Then again, I'm rather picky about my brownies.  Naturally, they have to meet the aforementioned requirements, and this recipe is a triple threat in my book!  Look at the moist layers of brownie cradling a creamy cheesecake baby in the middle :)


I'm a huge fan of a cream cheese (cheesecake) layer in the middle to match the chocolate in richness, yet round out the darkness of the semi-sweet chips.  Ice cream is equally delicious, but poses some problems if you're wanting to pack these in a lunch, take them on a picnic, or continually snitch one every time you walk past the pan ;)  And an ice cold glass of milk is a must!  Enjoy!


From one hearty appletite to another...happy baking!

Brownie Battter
3/4 cup sifted flour
1/2 teaspoon baking soda
1/2 teaspoon salt
1/3 cup butter
3/4 cup sugar
2 tablespoons water
1 teaspoon vanilla
2 cups chocolate chips, divided
2 eggs

In a small bowl, combine flour, soda and salt.  Set aside.

In a saucepan, melt butter, sugar and water together until sugar granules are dissolved.  Remove from heat and add 1 cup of chocolate chips and vanilla.  Add in eggs and mix well.  Pour in the flour mixture and stir in remaining chocolate chips.

Cheesecake Layer
8 ounces cream cheese
1/4 cup sugar
1 egg
1 teaspoon vanilla

In a mixer, combine all ingredients until smooth.

Grease a 9x9" glass baking pan.  Pour in 2/3 of the brownie batter.  Drop the cream cheese batter by spoonfuls on top, then pour in the remaining brownie batter.  With a knife, GENTLY make an "S" shape through all three layers of batter.  Resist the urge to stir too much! :)

Bake at 350F for 40-45 minutes, or until toothpick comes out clean.

Photograph © Hearty Appletite

Thursday, May 17, 2012

Tropical Summer Cake

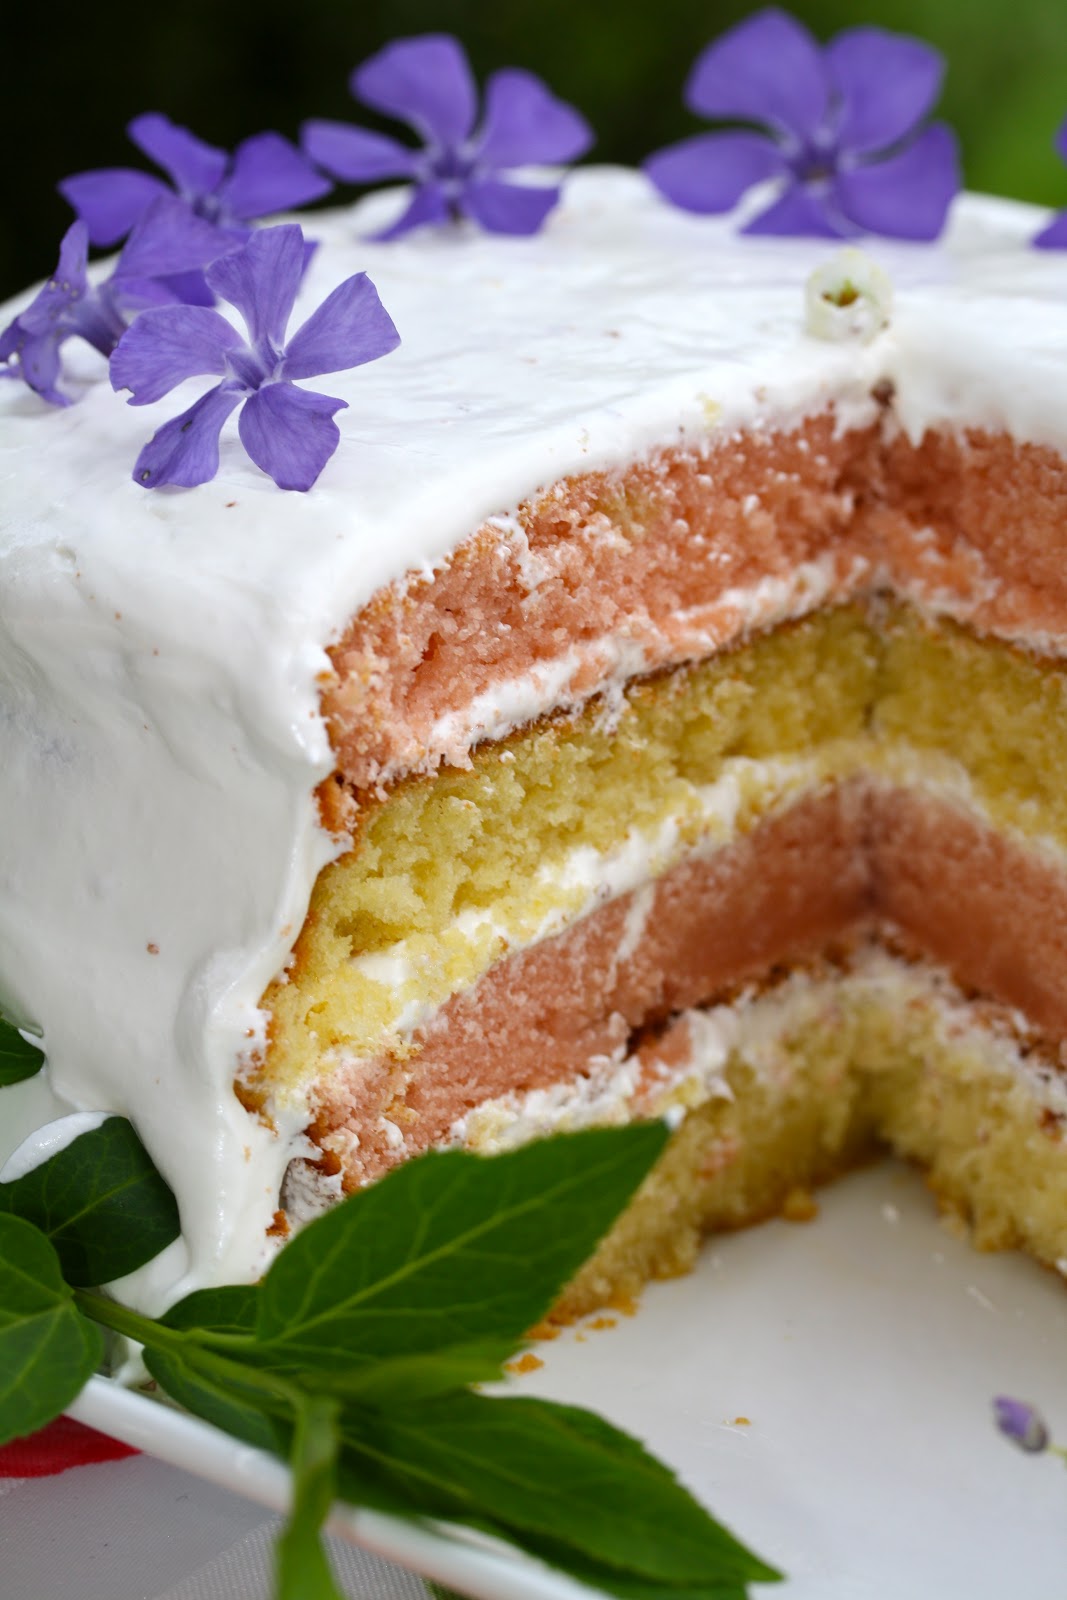
Tropical Summer Cake

For this month's Improv Challenge, hosted by Kristen at Frugal Antics of a Harried Homemaker, the two required ingredients are strawberries and cream.  Since I had just made this cake, I decided to hold off posting it until now because it met both requirements: strawberries and (butter)cream!   


The inspiration for this cake came from a layered lemonade cake that graced the front of my Better Homes and Gardens magazine.  I was excited to make it until I realized that the multi-colored layers were a product of red food dye, so I opted to make this cake using the natural color of strawberries and pineapple found in 100% fruit juice.


I made one 9" strawberry guava cake and one 9" pineapple starfruit cake, sliced them in half, and layered marshmallow buttercream in between and over the top!  Our backyard provided the lovely purple flower garnish, and we ate our Tropical Summer Cake on the deck of our Pacific Northwest home!


From one hearty appletite to another...happy baking!
Tropical Summer Cake, adapted from Better Homes and Gardens May 2012 issue
1/2 cup butter
2 eggs
1 1/2 cups + 2 tablespoons flour
1 1/2 teaspoons baking powder
1/4 teaspoon salt
1 cup sugar
1/2 cup milk
1/4 cup frozen juice concentrate* (I used strawberry guava and pineapple starfruit)

Allow butter and eggs to stand at room temperature for 30 minutes.  Meanwhile, grease two 9x2-inch round cake pans.  Line bottoms with waxed paper; grease paper.  Flour pans, tapping to remove excess; set aside.  In medium bowl stir together flour, caking powder and salt; set aside.

Preheat oven to 350 degrees F.  In an extra-large mixing bowl beat butter with mixer on medium to high for 30 seconds.  Gradually add sugar, a little bit at a time, beating on medium until well combined.  Scrape sides of bowl; beat 2 minutes more.  Add eggs one at a time, beating well after each addition.

In a bowl stir together milk and juice concentrate.  Alternately add flour mixture and milk mixture to butter mixture, beating on low after each addition just until combined.  Spread the batter in pan.

Bake about 35 minutes, until top springs back when lightly touched, or toothpick comes out clean.  Cool in pan on wire rack.  Trim off domed top and cut horizontally in half.  Brush crumbs from layer.

Repeat recipe using a different flavor juice for the second cake.

*Next time I make this, I'm going to use strawberry purée for a deeper color and a more intense berry flavor.

Marshmallow Buttercream Frosting
3 cups unsalted butter, softened
2 16-ounce jars marshmallow creme
1 cup powdered sugar

In a very large mixing bowl, beat softened butter with mixer on medium for 30 seconds, until light and fluffy.  Add marshmallow creme and beat until smooth.  Add powdered sugar and beat until light and fluffy.  


To assemble cake:  Place one layer, cut side down, on a plate.  Spread 1 cup of frosting just to edges.  Top with next layer, and repeat this process until all the layers and stacked.  Spread remaining frosting over the top and sides.  Garnish with strawberries, starfruit, or flowers...your choice! :)

Photograph © Hearty Appletite